KB: Route Based Site-to-Site VPN with OpenWRT/LEDE and Ubuntu VM in Azure

Azure VM Confugruation

  • OS: Ubuntu Server 17, etc
  • Virtual Network/Subnet: 10.0.0.0/24
  • Private IP: 10.0.0.4
  • Public IP: 51.x.x.x
  • Inbound security rules
    • Allow UDP 500
    • Allow UDP 4500

Enable IP forwarding

  • Edit /etc/sysctl.conf and enable the followings
    net.ipv4.ip_forward=1
    net.ipv4.conf.all.accept_redirects = 0
    net.ipv4.conf.all.send_redirects = 0
    
  • Apply settings
    sudo sysctl -p
    

Install StrongSwan

sudo apt-get install strongswan

Config IPSec – /etc/ipsec.conf

# ipsec.conf - strongSwan IPsec configuration file

# basic configuration

config setup
# strictcrlpolicy=yes
# uniqueids = no

conn %default
        ikelifetime=60m
        keylife=20m
        rekeymargin=3m
        keyingtries=1
        authby=secret
        keyexchange=ikev2

conn 41D
        auto=add
        type=tunnel
        aggressive=no
        ike=aes256-sha1-modp1024,3des-sha1-modp1024
        esp=aes256-sha1,3des-sha1
        mark_in=42
        mark_out=42

        left=10.0.0.4
        leftsubnet=0.0.0.0/0
        leftid=51.x.x.x
        leftauth=psk
        leftfirewall=yes

        right=59.x.x.x
        rightsubnet=192.168.5.0/24
        rightauth=psk
        rightfirewall=yes

Config IPSec – /etc/ipsec.secrets

# /etc/ipsec.secrets - strongSwan IPsec secrets file
59.x.x.x 51.x.x.x : PSK "secret"

Config IPSec – /etc/strongswan.conf

# strongswan.conf - strongSwan configuration file
#
# Refer to the strongswan.conf(5) manpage for details
#
# Configuration changes should be made in the included files

charon {
        install_routes=no
        install_virtual_ip=no

        load_modular = yes
        plugins {
                include strongswan.d/charon/*.conf
        }
}

include strongswan.d/*.conf

Config IPSec – Reconnect

ipsec restart
ipsec statusall

Config VTI

ip tunnel add vti0 local 10.0.0.4 remote 59.x.x.x mode vti key 42
ip link set vti0 up

Config Routing

ip route add 192.168.5.0/24 dev vti0

Config SNAT and DNS Forwarding

iptables -t nat -A PREROUTING -p udp --dport 53 -j DNAT --to 8.8.8.8
iptables -t nat -A PREROUTING -p tcp --dport 53 -j DNAT --to 8.8.8.8
iptables -t nat -A POSTROUTING -s 192.168.5.0/24 -o eth0 -j SNAT --to-source 10.0.0.4

OpenWRT/LEDE Configuration

Install StrongSwan and VTI packages

strongswan-minimal
ip-full
kmod-ip-vti
vtiv4

Config IPSec – /etc/ipsec.conf

# ipsec.conf - strongSwan IPsec configuration file
# basic configuration

config setup
        # strictcrlpolicy=yes
        # uniqueids = no

conn %default
        ikelifetime=60m
        keylife=20m
        rekeymargin=3m
        keyingtries=1
        authby=secret
        keyexchange=ikev2

conn UKGW
        auto=start
        closeaction=restart
        type=tunnel
        aggressive=no
        ike=aes256-sha1-modp1024,3des-sha1-modp1024
        esp=aes256-sha1,3des-sha1
        mark_in=42
        mark_out=42
        left=59.x.x.x
        leftsubnet=192.168.3.0/24
        leftid=59.x.x.x
        leftauth=psk
        leftfirewall=yes

        right=51.x.x.x
        rightsubnet=0.0.0.0/0
        rightid=51.x.x.x
        rightauth=psk
        rightfirewall=yes

Config IPSec – /etc/ipsec.secrets

# /etc/ipsec.secrets - strongSwan IPsec secrets file
59.x.x.x 51.x.x.x : PSK "secret"

Config IPSec – /etc/strongswan.conf

# strongswan.conf - strongSwan configuration file
#
# Refer to the strongswan.conf(5) manpage for details
#
# Configuration changes should be made in the included files

charon {
        install_routes=no
        install_virtual_ip=no

        load_modular = yes
        plugins {
                include strongswan.d/charon/*.conf
        }
}

include strongswan.d/*.conf

Config IPSec – Reconnect

ipsec restart
ipsec statusall

Config VTI

ip tunnel add vti0 local 59.x.x.x remote 51.x.x.x mode vti key 42
ip link set vti0 up

Config Routing 1

ip route add 10.0.0.0/24 dev vti0

Config Routing 2 – set subnet default route to Azure VM

ip rule add from 192.168.3.0/24 table 1000
ip route add 0.0.0.0/0 dev vti0 table 1000
ip route show table 1000

iptables -A PREROUTING -p udp -s 192.168.3.0 --dport 53 -j DNAT --to 10.0.0.4
iptables -A PREROUTING -p tcp -s 192.168.3.0 --dport 53 -j DNAT --to 10.0.0.4

Others

  • Add interface and zone for vti0. Allow transfer to/from LAN.
  • Enable MSS Clamping for VTI interface.
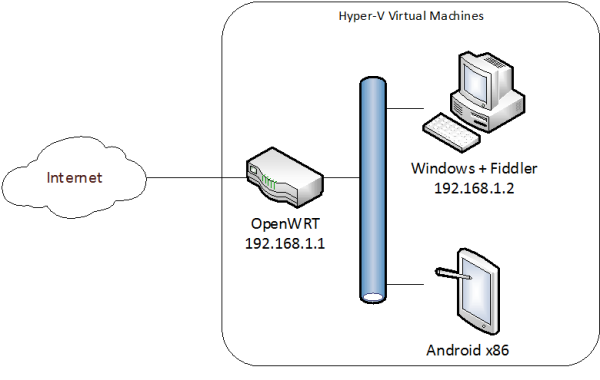
HOWTO: OpenWRT and Fiddler for HTTP and HTTPS Transparent Proxy traffic capture – Part 2

Goal:

  • Setup a Hyper-V test lab for capturing traffic from an Android client.
  • Use OpenWRT as the routing gateway for the private VM network and Transparent Proxy HTTP and HTTPS traffic to Fiddler.
  • Config Fidder for traffic capture.

See Also:


Configuring OpenWRT for Transpart Proxy

  • Create Port Forward / Pre-routing rules for TCP port 80 and 443 to forward traffic to Fiddler.
    • Assuming Fiddler is running at 192.168.1.2, port 8888 for HTTP proxy and 8443 for HTTPS proxy.
    • Exclude the Fiddler machine from the port forward.


  • Create Source NAT / Post-routing rule


  • OR write the rules in the Firewall Custom Rules page.


Configuring Fiddler for Transpart Proxy

  • Enable “Allow remote computers to connect” in Fiddler Options and open corresponding ports in the Windows Firewall.


  • Use the command “!listen 8443 your_dummy_CN” to make Fiddler to listen to port 8443 for HTTPS proxy.
    • The dummy CN value is important. Without the CN value Fiddler will not handle the HTTPS handshake.


  • Use the command “prefs set fiddler.network.https.SetCNFromSNI true” to make Fiddler to generate the cert with CN to match the incoming request.

HOWTO: OpenWRT and Fiddler for HTTP and HTTPS Transparent Proxy traffic capture – Part 1

Goal:

  • Setup a Hyper-V test lab for capturing traffic from an Android client.
  • Use OpenWRT as the routing gateway for the private VM network and Transparent Proxy HTTP and HTTPS traffic to Fiddler.
  • Config Fidder for traffic capture.

See Also:

Notes on the OpenWRT installation

The OpenWRT installation basically follows the guide at https://miracoin.wordpress.com/2014/05/28/openwrt-in-hyper-v/. Here a few more tips for building the Hyper-V image:

  • Configure the Hyper-V virtual switch for the connection to the physical network and a private virtual machine network to the VM.

  • Create a new Hyper-V machine with the following settings:
    • 1 virtual processor and 64MB memory (You don’t need too much power for OpenWRT)
    • 2 Legacy Network Adapters (This is important. There’s no driver for the standard Network Adapter)
    • Bind the adapters to the physical and private virtual network.

  • Create the OpenWRT disk image

Good & Bad News: Synology Disk Station Manager 2.2 BETA added iSCSI target support, but it lacks“persistent reservation”support so making it not usable for Windows Server 2008 cluster storage

I’ve been awaiting for the Synology NAS firmware upgrade with iSCSI support so I can try out Windows Server 2008 failover clustering on my Hyper-V box. The good news is the DSM 2.2 BETA is out with iSCSI but it is IET based which lacks SCSI-3 persistent reservation support required by Windows Server 2008 cluster. Same problem for some other software iSCSI targets, e.g. OpenFiler


Reference:

http://blog.baeke.info/blog/_archives/2007/10/24/3311645.html 

http://iscsitarget.sourceforge.net/

My Certificate Authority Lab Setup (Part 1) – Offline Root CA

To start with something simple I’m building up a 2-tier CA hierarchy incorporating an offline root CA and and issuing Windows Server 2003 Enterprise CA.

image

Some notes on my Root CA setup:

  1. Install Windows Server 2003, Standard Edition is good enough for an offline CA.
  2. Workgroup only, DO NOT join Domain.
  3. Think twice on the Computer Name before starting CA installation, computer cannot be renamed afterwards.
  4. IMPORTANT! Create CAPolicy.inf in C:\WINDOWS (or %SYSTEMROOT%) to specify empty CRL distribution point and AIA.
    Example:
    [Version]
    Signature= “$Windows NT$”

    [Certsrv_Server]
    RenewalKeyLength=4096
    RenewalValidityPeriod=Years
    RenewalValidityPeriodUnits=5
    CRLPeriod=days
    CRLPeriodUnits=180

    [CRLDistributionPoint]
    Empty=TRUE

    [AuthorityInformationAccess]
    Empty=TRUE

    [PolicyStatementExtension]
    Policies=AllIssurancePolicy
    Critical=FALSE

    [AllIssurancePolicy]
    OID=2.5.29.32.0
    URL=http://www.contoso.com/cert/cps.htm

  5. Install Certificate Services only and do not install IIS and other services to minimize attack surface. You don’t need web enrollment for this offline CA.
  6. Use custom settings to specify key length as 4096 bits and 5 years validity. (Watch out for Domino root certificate key length support, use 2048-bit if any SubCA is going to issue certificate for S/MIME for Domino 6 & 7. More on MyKB)
  7. After installation, use “certutil –setreg ca\[name]” to set issuing validity timespan and default container distinguished name referenced by CDP and AIA LDAP URL.
    Registry Value
    ValidityPeriod Years
    ValidityPeriodUnits 2
    DSConfigDN CN=Configuration,DC=contoso,DC=com
  8. Config CA’s CDP and AIA locations. The objective is to use external FQDN instead of computer name for the HTTP URL and to make it comes before LDAP URL.
  9. Remove the default URLs except the local disk location and add back the followings URLs
    CDP URL Options
    http://www.contoso.com/cert/%3%8%9.crl CSURL_ADDTOCERTCDP — 2
    ldap:///CN=%7%8,CN=%2,CN=CDP,CN=Public Key Services,CN=Services,%6%10 CSURL_ADDTOCERTCDP — 2
    CSURL_ADDTOFRESHESTCRL — 4
    CSURL_ADDTOCRLCDP — 8
    AIA URL
    http://www.contoso.com/cert/%1_%3%4.crt CSURL_ADDTOCERTCDP – 2
    ldap:///CN=%7,CN=AIA,CN=Public Key Services,CN=Services,%6%11 CSURL_ADDTOCERTCDP – 2
  10. Config CRL publication interval and make sure Delta CRL is disabled. (Which an interval of 180 days is already specified in the CAPolicy.inf file).
  11. Publish the CRL and examine the CDP location. Make sure the DSConfigDN registry is correctly setup and you are not seeing “DC=UnavailableConfigDN namespace”in the LDAP URL.

OK, the root CA is now ready. The next would be the issuing enterprise CA.

References: